Doxygen
What is Doxygen?
Doxygen is a tool that can create documentation for your project from your codebase. Doxygen outputs her documentation by default as a html file which one can put online for the rest of the word to see, however Doxygen can also export to Word, PostScript, PDF and much more. Doxygen supports C++, C, Objective-C, C#, PHP, Java, Python and many more languages. Please refer to the website of Doxygen for a full list of all the languages and output formats that Doxygen support (link at the end of this article).
Why would one want to use Doxygen?
Making your code understandable for other programmers is a skill that is most of the times underestimated. Doxygen can really help you to display documentation for your code in a more visualized way then just the comments above functions and variables we are used to.
More ways to use Doxygen?
Doxygen can be used for more ways then just generating documentation out of commented codebase.
One can configure Doxygen as well to extract the code structure from undocumented source files. One can say that it is also handy to export none documented source files since Doxygen can output various graphs, inheritance diagrams and collaboration diagrams as well which makes it easy to quickly overview the codebase of a project and find specific elements in the codebase.
Like earlier said, Doxygen can export to multiple formats. By default Doxygen generates html however one can also choose to export to Word, PostScript, a PDF and much more. Depending on the use case of Doxygen and code base of the project one might want to export to a different output format as well.
Note: Choosing to export to a different output format then html is something to really think about. One does not want to generate a huge PDF file because the code base for that specific project is very big. Generating a PDF file makes in that case more sense to do in a project with a small codebase.
How do you generate documentation with Doxygen
I will go over how to create documentation with Doxygen since the default use case of Doxygen is to create documentation. There are multiple ways to generate documentation with Doxygen. One is by using the GUI tool provided with Doxygen and the other one is to create documentation through the command line. Depending on how one works with Doxygen will favor one approach over the other. Before I can go over the two different ways of generating documentation, I should first go over the code base that I will use to show you how to generate documentation and I shall go over how one actually should comment their code in order to let Doxygen generate the documentation.
Doxygen can be downloaded either through the website of Doxygen or the GitHub repo of Doxygen.
I kept the code base to a minimum of 2 classes because this is meant to be a very short tutorial about Doxygen.
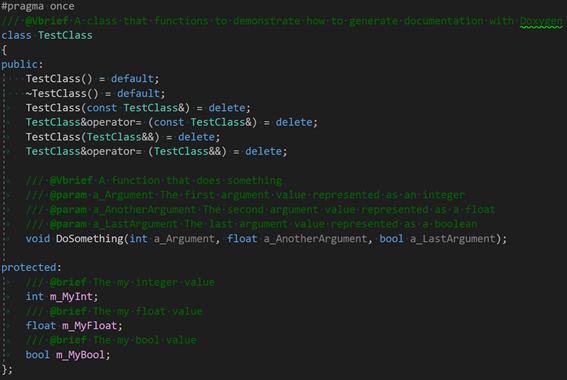
Image 1: A screenshot of the first class used to demonstrate how to generate documentation with Doxygen. (implementation details of this class are not important for the purpose of this tutorial).
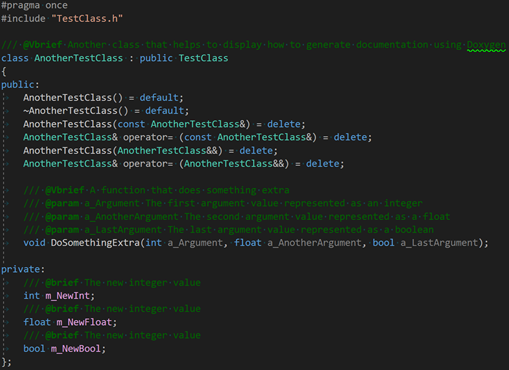
Image 2: A screenshot of the second class used to demonstrate how to generate documentation with Doxygen. (implementation details of this class are not important for the purpose of this tutorial).
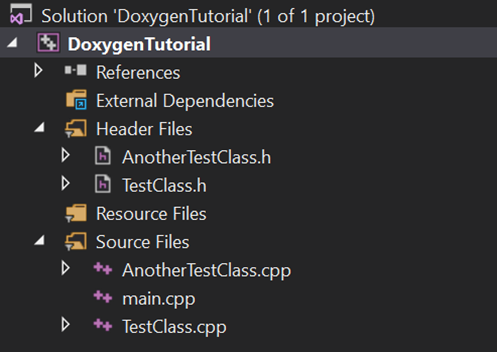
Image 3: A screenshot of my Solution Explorer for this codebase.
Notice the brief and param elements in the comments. These element are required above a function and the brief element is required above a class or member variable of a class where Doxygen detects this and makes documentation with.
Note: There are multiple ways of commenting your code for Doxygen documentation generation however this is the approach I have personally seen the most when people are using Doxygen.
One can see a screenshot of the Doxywizard GUI tool below that is provided by Doxygen. On first glance this might look like a very simple tool is is very powerful once understood.
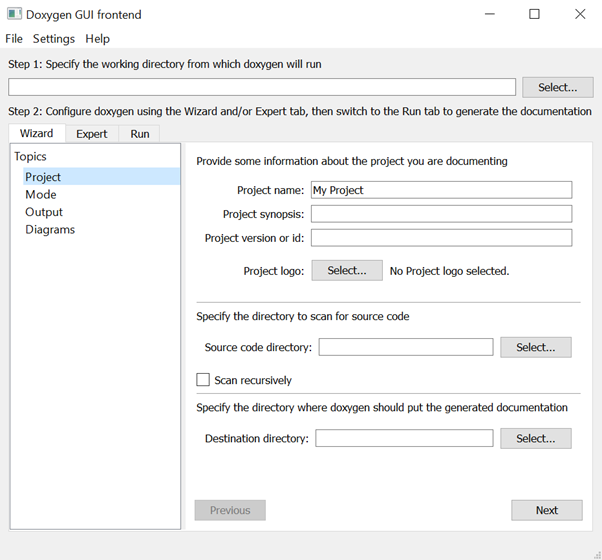
Image 4: : A screenshot of the Doxywizard tool provided by Doxygen when just booted up.
I will discuss the elements I think need some extra explanation to fill in below.
One has to fill in the working directory in step 1. This is just a temporary directory where Doxygen stores its temporary files when generating documentation from a codebase. Once documentation is generated one can delete this directory.
Filling in this has no consequence for the generation of your documentation. I usually begin counting from 1.0 and for every new version of my documentation I go up by 0.1, meaning 1.1, 1.2, 1.3 etc.
As one might already have wondered, this is the directory towards your codebase. Note that this needs to be the same directory as where your actual code is.
When checked Doxygen will scan your entire code base recursively for code files. In our case we don’t need to check this option since we only have 2 header files to document.
Where do you want to output your documentation? Note that Doxygen generates a bunch of html, css and more files so choosing this directory must be done with thought.
Note: Choosing the same directory for your working and destination directory will result in no documentation.
Note: Choosing your working directory as your source code directory will wipe your entire project which is something that never must be done.
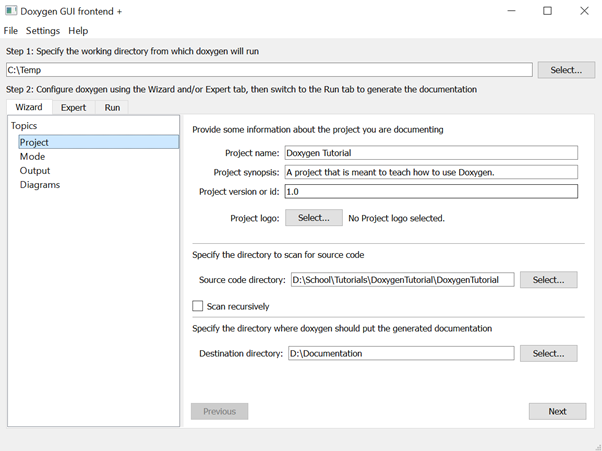
Image 5: A screenshot of the Doxywizard tool filled in by me for the purpose of this tutorial.
The “Mode” page gives you an overview of for what to optimize this Doxygen project. For this particular example we can leave it on “Optimize for C++ output”.
For this particular example. We want “plain HTML” to be generated by Doxygen. Doxygen should have selected this automatically so nothing has to be changed here.
Doxygen has the possibility to generate diagrams when generating documentation. This could be inheritance diagrams but also other diagrams. For this particular example please select “Use built-in class diagram generator.
One can select to enable multiple variables in the expert mode. With the expert mode one can go really in depth in what to particulairy generate from our code base with Doxygen. For example by default private member variables are not documented by Doxygen which we have to enable enabling the Expert -> Build -> EXTRACT_PRIVATE option. Doxywizard will show one of these option as a red text value once it is selected in its none standard selected state.
For the final step we can click on the “Run” tab and click on the “Run Doxygen” button. When clicked one can see some output produced by Doxygen in the output window. Once done one can click on the “Show HTML output” button in the left button corner of the window which will open the main html file. Here one can navigate to our “TestClass” and “AnotherTestclass” in the “Classes” tab on the html page.
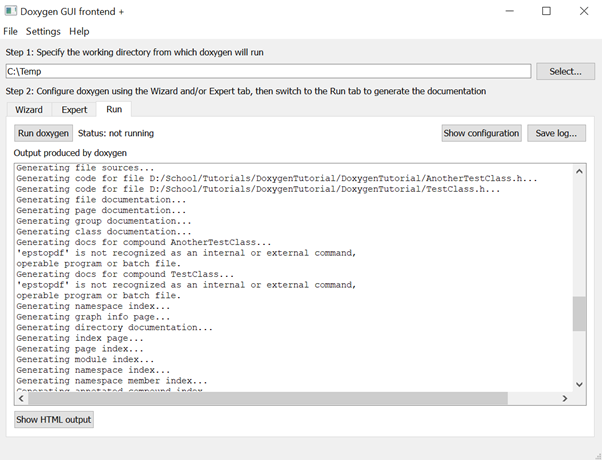
Image 6: Screenshot that shows documentation being build using the Doxywizard GUI tool.
And there you have it! Generated documentation from your codebase through the Doxywizard GUI tool. Now you can go to the destination where you wanted your documentation to be build and you can navigate to the html -> index.html file which will open the default html file that one will see for your documentation.
Documentation from your code base can also be generated using the command line tools of Doxygen. In the section below here I will discuss how to generate documentation using the command line tools of Doxygen.
Doxygen uses a so called “configuration” file when generating documentation through the command line tools. This is a .txt file that contain all the variables that were shown in the Doxywizard GUI tool that one can manually edit. Below is shown how to generate a configuration through the command line.
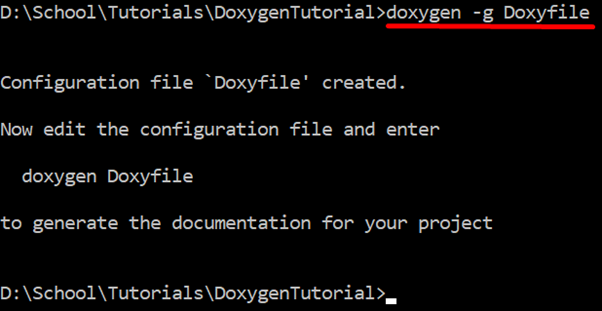
Image 7: Screenshot that shows how to generate a Doxygen configuration file.
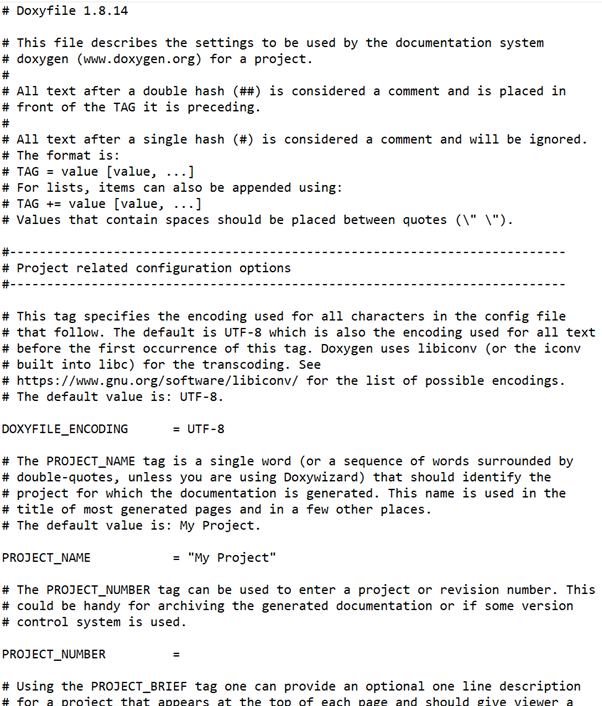
Image 8: A part of the default generated Doxygen configuration file.
Theoratically every option in this configuration file should match the variable name in the Doxywizard tool, however some variables are named slightly different in this configuration file. Below is shown a quick recap of what you have to change in this configuration file in order to get the same output result as the setup in the Doxywizard tool.
PROJECT_NAME:Your project name.
PROJECT_NUMBER:Your current project version or id.
PROJECT_BRIEF:A description of your project.
OUTPUT_DIRECTORY:Where does the documentation needs to be build?
INPUT:The directory to your source code that needs to be documented.
EXTRACT_PRIVATE:Extract private variables.
Note: There are some variables in this file that have different names then the variables in the Doxywizard tool. Keep an eye out for this! One way to figure out which variable is which is to select the “Show configuration” option in the Doxywizard GUI tool once all variables are correctly put in the GUI tool. This will show you the same variable names with their generated variable paths / values.
Note: All variables in the configuration file are commented. If you are ever unsure what a specific variable does, please refer to either the comment above the variable or refer to the main Doxygen site.
Type the following in your command line in order to generate documentation through a documentation file.

Image 9: A screenshot that explains how to generate documentation through a Doxygen configuration file with the command line.
And there you have it! Generated documentation from your codebase through a configuration file. Now you can go to the destination where you wanted your documentation to be build and you can navigate to the html -> index.html file which will open the default html file that one will see for your documentation.
You can now explore your generated documentation with Doxygen. Like I said the base html file to open in the index.html file. I will discuss some useful options that are key to navigating through your Doxygen documentation.
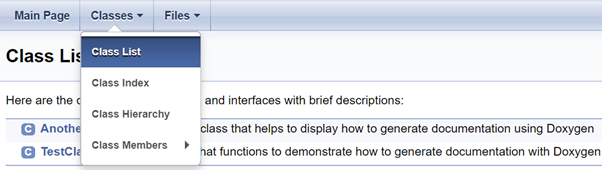
Image 10: A screenshot that shows the “Class List” option.
One can see all the documented classes when selecting the Class List option. For our example we of course only have 2 classes.
One can see all the documented text that we put into our example when one selects on of the two classes in the “Class List” option. Shown is the description for all the functions and variables we commented but also a page for a class shows possible includes, none documented functions and inheritance diagrams if the specific class is part of a inheritance hierarchy. Since our “AnotherTestClass” is and we put the option to display diagrams to true we will see diagrams.
Like discussed above, inerhitance diagrams will also be shown for a class if the class is part of a inheritance hierarchy. Through this diagram one can click on the other hierarchy classes to navigate to that specific class. I personally think this is one of the great features about Doxygen.
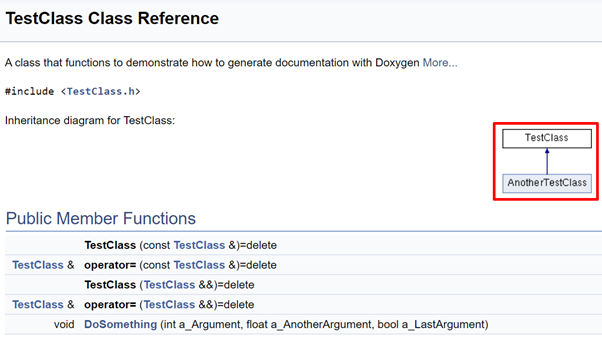
Image 11: : A screenshot that shows how inheritance diagrams are displayed with Doxygen.
Doxygen and GitHub
GitHub Actions can be used to automatically generate documentation with Doxygen using the configuration file option that was discussed in this blog post. With the correct use of GitHub Pages one can then publish documentation through a GitHub Action to GitHub Pages. Going even further, if this GitHub Action is called when one pushes or pulls to tshe repo then documentation would be automatically generated without you having to do anything for this. I will not go in depth on how to do this in this tutorial since this tutorial is meant as an introduction to Doxygen and since I think GitHub Actions and GitHub Pages deserve their own blogpost.
Conclusion
We have now seen 2 ways to generate documentation with Doxygen, why one would use Doxygen and example usages of Doxygen. Would I use Doxygen for every project I code? Probably not. But apart from generating documentation in a beautifull website display Doxygen also touches on the aspect of commenting code which is in my experience something that a lot of times not happens. Commenting your code gives you and others better insight of your code which I can’t stress enough how important that is. The fact that Doxygen build a GUI tool in order to generate documentation is a huge help if one is not familiar with the command line tools. Some might argue that this is not the best tool and could be improved a lot however they still provide it and if one looks at the GitHub repo of Doxygen one can see that they are still in the time of writing this blog post updating Doxygen every week. I really liked sharing my knowledge about Doxygen over a blog post. Would you agree with everything I talk about in this blog post? Do you find something not clear? Questions? Please refer to my portfolio site to contact my directly (https://www.jenspetter.nl)
Useful links
The official Doxygen download page.
Multiple ways to comment your code for Doxygen.
How to export Doxygen to different formats.
A list of projects generated by Doxygen.